LIGO and Virgo make their data open for anyone to try analysing [bonus note]. If you’re a student looking for a project, a teacher planning a class activity, or a scientist working on a paper, this data is waiting for you to use. Understanding how to analyse the data can be tricky. In this post, I’ll share some of the resources made by LIGO and Virgo to help introduce gravitational-wave analysis. These papers together should give you a good grounding in how to get started working with gravitational-wave data.
If you’d like a more in-depth understanding, I’d recommend visiting your local library for Michele Maggiore’s Gravitational Waves: Volume 1.
The Data Analysis Guide
Title: A guide to LIGO-Virgo detector noise and extraction of transient gravitational-wave signals
arXiv: 1908.11170 [gr-qc]
Journal: Classical & Quantum Gravity; 37(5):055002(54); 2020
Tutorial notebook: GitHub; Google Colab; Binder
Code repository: Data Guide
LIGO science summary: A guide to LIGO-Virgo detector noise and extraction of transient gravitational-wave signals
It took many decades to develop the technology necessary to build gravitational-wave detectors. Similarly, gravitational-wave data analysis has developed over many decades—I’d say LIGO analysis was really kicked off in the early 1990s by Kipp Thorne’s group. There are now hundreds of papers on various aspects of gravitational-wave analysis. If you are new to the area, where should you start? Don’t panic! For the binary sources discovered so far, this Data Analysis Guide has you covered.
More details: The Data Analysis Guide
The GWOSC Paper
Title: Open data from the first and second observing runs of Advanced LIGO and Advanced Virgo
arXiv: 1912.11716 [gr-qc]
Journal: SoftwareX; 13:100658(20); 2021
Website: Gravitational Wave Open Science Center
LIGO science summary: Open data from the first and second observing runs of Advanced LIGO and Advanced Virgo
Data from the LIGO and Virgo detectors is released by the Gravitational Wave Open Science Center (GWOSC, pronounced, unfortunately, as it is spelt). If you want to try analysing our delicious data yourself, either searching for signals or studying the signals we have found, GWOSC is the place to start. This paper outlines how these data are produced, going from our laser interferometers to your hard-drive. The paper specifically looks at the data released for our first and second observing runs (O1 and O2), however, GWOSC also host data from the initial detectors’ fifth science run (S5) and sixth science run (S6), and will be updated with new data in the future.
If you do use data from GWOSC, please remember to say thank you.
More details: The GWOSC Paper

I thought I saw a 2! Credit: Fox
The Data Analysis Guide
Synopsis: Data Analysis Guide
Read this if: You want an introduction to signal analysis
Favourite part: This is a great resource for new students [bonus note]
Gravitational-wave detectors measure ripples in spacetime. They record a simple time series of the stretching and squeezing of space as a gravitational wave passes. Well, they measure that, plus a whole lot of noise. Most of the time it is just noise. How do we go from this time series to discoveries about the Universe’s black holes and neutron stars? This paper gives the outline, it covers (in order)
- An introduction to observations at the time of writing
- The basics of LIGO and Virgo data—what it is the we analyse
- The basics of detector noise—how we describe sources of noise in our data
- Fourier analysis—how we go from time series to looking at the data in the as a function of frequency, which is the most natural way to analyse that data.
- Time–frequency analysis and stationarity—how we check the stability of data from our detectors
- Detector calibration and data quality—how we make sure we have good quality data
- The noise model and likelihood—how we use our understanding of the noise, under the assumption of it being stationary, to work out the likelihood of different signals being in the data
- Signal detection—how we identify times in the data which have a transient signal present
- Inferring waveform and physical parameters—how we estimate the parameters of the source of a gravitational wave
- Residuals around GW150914—a consistency check that we have understood the noise surrounding our first detection
The paper works through things thoroughly, and I would encourage you to work though it if you are interested.
I won’t summarise everything here, I want to focus the (roughly undergraduate-level) foundations of how we do our analysis in the frequency domain. My discussion of the GWOSC Paper goes into more detail on the basics of LIGO and Virgo data, and some details on calibration and data quality. I’ll leave talking about residuals to this bonus note, as it involves a long tangent and me needing to lie down for a while.
Fourier analysis
The signal our detectors measure is a time series . This is may just contain noise,
, or it may also contain a signal,
.
There are many sources of noise for our detectors. The different sources can affect different frequencies. If we assume that the noise is stationary, so that it’s properties don’t change with time, we can simply describe the properties of the noise with the power spectral density . On average we expect the noise at a given frequency to be zero, but with it fluctuating up and down with a variance given by the power spectral density. We typically approximate the noise as Gaussian, such that
,
where we use to represent a normal distribution with mean
and standard deviation
. The approximations of stationary and Gaussian noise are good most of the time. The noise does vary over time, but is usually effectively stationary over the durations we look at for a signal. The noise is also mostly Gaussian except for glitches. These are taken into account when we search for signals, but we’ll ignore them for now. The statistical description of the noise in terms of the power spectral density allows us to understand our data, but this understanding comes as a function of frequency: we must transform of time domain data to frequency domain data.
The go from to
we can use a Fourier transform. Fourier transforms are a way of converting a function of one variable into a function of a reciprocal variable—in the case of time you convert to frequency. Fourier transforms encode all the information of the original function, so it is possible to convert back and forth as you like. Really, a Fourier transform is just another way of looking at the same function.
The Fourier transform is defined as
.
Now, from this you might notice a problem when it comes to real data analysis, namely that the integral is defined over an infinite amount of time. We don’t have that much data. Instead, we only have a short period.
We could recast the integral above over a shorter time if instead of taking the Fourier transform of , we take the Fourier transform of
where
is some window function which goes to zero outside of the time interval we are looking at. What we end up with is a convolution of the function we want with the Fourier transform of the window function,
.
It is important to pick a window function which minimises the distortion to the signal that we want. If we just take a tophat (also known as a boxcar or rectangular, possibly on account of its infamous criminal background) function which is abruptly cuts off the data at the ends of the time interval, we find that is a sinc function. This is not a good thing, as it leads to all sorts of unwanted correlations between different frequencies, commonly known as spectral leakage. A much better choice is a function which smoothly tapers to zero at the edges. Using a tapering window, we lose a little data at the edges (we need to be careful choosing the length of the data analysed), but we can avoid the significant nastiness of spectral leakage. A tapering window function should always be used. Then or finite-time Fourier transform is then a good approximation to the exact
.
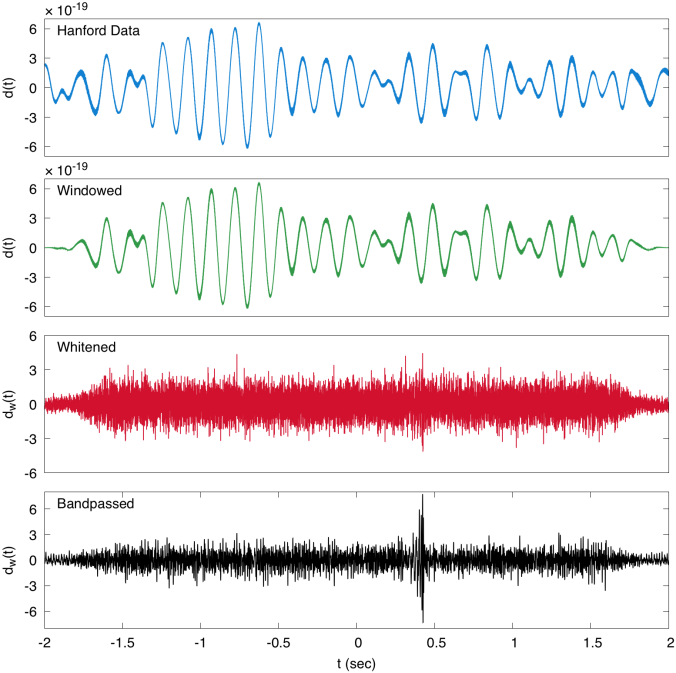
Data processing to reveal GW150914. The top panel shows raw Hanford data. The second panel shows a window function being applied. The third panel shows the data after being whitened. This cleans up the data, making it easier to pick out the signal from all the low frequency noise. The bottom panel shows the whitened data after a bandpass filter is applied to pick out the signal. We don’t use the bandpass filter in our analysis (it is just for illustration), but the other steps reflect how we treat our data. Figure 2 of the Data Analysis Guide.
Now we have our data in the frequency domain, it is simple enough to compare the data to the expected noise a t a given frequency. If we measure something loud at a frequency with lots of noise we should be less surprised than if we measure something loud at a frequency which is usually quiet. This is kind of like how somewhat shouting is less startling at a rock concert than in a library. The appropriate way to weight is to divide by the square root of power spectral density . This is known as whitening. Whitened data should have equal amplitude fluctuations at all frequencies, allowing for easy comparisons.
Now we understand the statistical properties of noise we can do some analysis! We can start by testing our assumption that the data are stationary and Gaussian by checking that that after whitening we get the expected distribution. We can also define the likelihood of obtaining the data given a model of a gravitational-wave signal
, as the properties of the noise mean that
. Combining the likelihood for each individual frequency gives the overall likelihood
.
This likelihood is at the heart of parameter estimation, as we can work out the probability of there being a signal with a given set of parameters. The Data Analysis Guide goes through many different analyses (including parameter estimation) and demonstrates how to check that noise is nice and Gaussian.
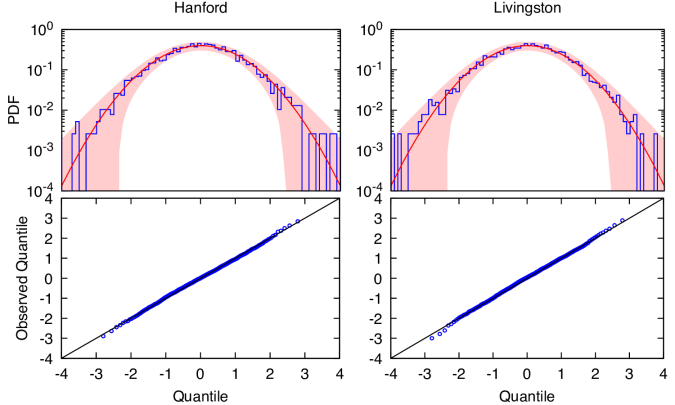
Distribution of residuals for 4 seconds of data around GW150914 after subtracting the maximum likelihood waveform. The residuals are the whitened Fourier amplitudes, and they should be consistent with a unit Gaussian. The residuals follow the expected distribution and show no sign of non-Gaussianity. Figure 14 of the Data Analysis Guide.
Homework
The Data Analysis Guide contains much more material on gravitational-wave data analysis. If you wanted to delve further, there many excellent papers cited. Favourites of mine include Finn (1992); Finn & Chernoff (1993); Cutler & Flanagan (1994); Flanagan & Hughes (1998); Allen (2005), and Allen et al. (2012). I would also recommend the tutorials available from GWOSC and the lectures from the Open Data Workshops.
The GWOSC Paper
Synopsis: GWOSC Paper
Read this if: You want to analyse our gravitational wave data
Favourite part: All the cool projects done with this data
You’re now up-to-speed with some ideas of how to analyse gravitational-wave data, you’ve made yourself a fresh cup of really hot tea, you’re ready to get to work! All you need are the data—this paper explains where this comes from.
Data production
The first step in getting gravitational-wave data is the easy one. You need to design a detector, convince science agencies to invest something like half a billion dollars in building one, then spend 40 years carefully researching the necessary technology and putting it all together as part of an international collaboration of hundreds of scientists, engineers and technicians, before painstakingly commissioning the instrument and operating it. For your convenience, we have done this step for you, but do feel free to try it yourself at home.
Gravitational-wave detectors like Advanced LIGO are built around an interferometer: they have two arms at right angles to each other, and we bounce lasers up and down them to measure their length. A passing gravitational wave will change the relative length of one arm relative to the other. This changes the time taken to travel along one arm compared to the other. Hence, when the two bits of light reach the output of the interferometer, they’ll have a different phase:where normally one light wave would have a peak, it’ll have a trough. This change in phase will change how light from the two arms combine together. When no gravitational wave is present, the light interferes destructively, almost cancelling out so that the output is dark. We measure the brightness of light at the output which tells us about how the length of the arms changes.
We want our detector in measure the gravitational-wave strain. That is the fractional change in length of the arms,
,
where is the relative difference in the length of the two arms, and
is the usually arm length. Since we love jargon in LIGO & Virgo, we’ll often refer to the strain as HOFT (as you would read
as h of t; it took me years to realise this) or DARM (differential arm measurement).
The actual output of the detector is the voltage from a photodiode measuring the intensity of the light. It is necessary to make careful calibration of the detectors. In theory this is simple: we change the position of the mirrors at the end of the arms and see how the output changes. In practise, it is very difficult. The GW150914 Calibration Paper goes into details for O1, more up-to-date descriptions are given in Cahillane et al. (2017) for LIGO and Acernese et al. (2018) for Virgo. The calibration of the detectors can drift over time, improving the calibration is one of the things we do between originally taking the data and releasing the final data.
The data are only celebrated between 10 Hz and 5 kHz, so don’t trust the data outside of that frequency range.
The next stage of our data’s journey is going through detector characterisation and data quality checks. In addition to measuring gravitational-wave strain, we record many other data channels: about 200,000 per detector. These measure all sorts of things, from the internal state of the instrument, to monitoring the physical environment around the detectors. These auxiliary channels are used to check the data quality. In some cases, an auxiliary channel will record a source of noise, like scattered light or the mains power frequency, allowing us to clean up our strain data by subtracting out this noise. In other cases, an auxiliary channel can act as a witness to a glitch in our detector, identifying when it is misbehaving so that we know not to trust that part of the data. The GW150914 Detector Characterisation Paper goes into details of how we check potential detections. In doing data quality checks we are careful to only use the auxiliary channels which record something which would be independent of a passing gravitational wave.
We have 4 flags for data quality:
- DATA: All clear. Certified fresh. Eat as much as you like.
- CAT1: A critical problem with the instrument. Data from these times are likely to be a dumpster fire of noise. We do not use them in our analyses, and they are currently excluded from our public releases. About 1.7% of Hanford data and 1.0% of time from Livingston was flagged with CAT1 in O1. In O2, we got this done to 0.001% for Hanford, 0.003% for Livingston and 0.05% for Virgo.
- CAT2: Some activity in an auxiliary channel (possibly the electric boogaloo monitor) which has a well understood correlation with the measured strain channel. You would therefore expect to find some form of glitchiness in the data.
- CAT3: There is some correlation in an auxiliary channel and the strain channel which is not understood. We’re not currently using this flag, but it’s kept as an option.
It’s important to verify the data quality before starting your analysis. You don’t want to get excited to discover a completely new form of gravitational wave only to realise that it’s actually some noise from nearby logging. Remember, if a tree falls in the forest and no-one is around, LIGO will still know.
To test our systems, we also occasionally perform a signal injection: we move the mirrors to simulate a signal. This is useful for calibration and for testing analysis algorithms. We don’t perform injections very often (they get in the way of looking for real signals), but these times are flagged. Just as for data quality flags, it is important to check for injections before analysing a stretch of data.
Once passing through all these checks, the data is ready to analyse!
Excited Data. Credit: Paramount
Accessing the data
After our data have been lovingly prepared, they are served up in two data formats:
- Hierarchical Data Format HDF, which is a popular data storage format, as it is easily allows for metadata and multiple data sets (like the important data quality flags) to be packaged together.
- Gravitational Wave Frame GWF, which is the standard format we use internally. Veteran gravitational-wave scientists often get a far-way haunted look when you bring up how the specifications for this file format were decided. It’s best not to mention unless you are also buying them a stiff drink.
In these files, you will find sampled at either 4096 Hz or 16384 Hz (either are available). Pick the sampling rate you need depending upon the frequency range you are interested in: the 4096 Hz data are good for upto 1.7 kHz, while the 16384 Hz are good to the limit of the calibration range at 5 kHz.
Files can be downloaded from the GWOSC website. If you want to download a large amount, it is recommended to use the CernVM-FS distributed file system.
To check when the gravitational-wave detectors were observing, you can use the Timeline search.
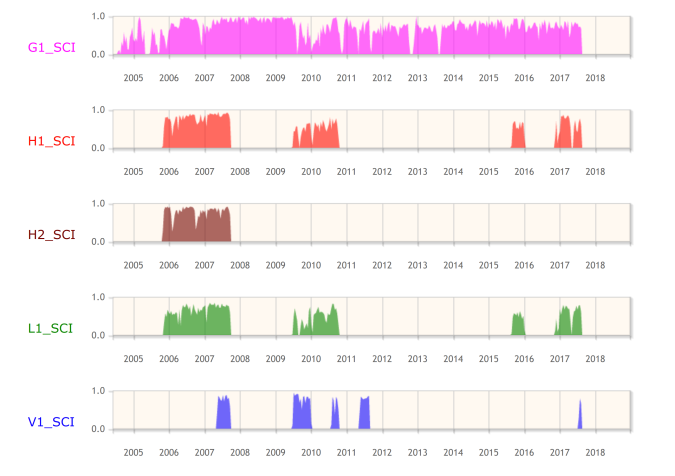
Screenshot of the GWOSC Timeline showing observing from the fifth science run (S5) on the initial detector era through to the second observing run (O2) of the advanced detector era. Bars show observing of GEO 600 (G1), Hanford (H1 and H2), Livingston (L1) and Virgo (V1). Hanford initial had two detectors housed within its site, the plan in the advanced detector era is to install the equipment as LIGO India instead.
Try this at home
Having gone through all these details, you should now know what are data is, over what ranges it can be analyzed, and how to get access to it. Your cup of tea has also probably gone cold. Why not make yourself a new one, and have a couple of biscuits as reward too. You deserve it!
To help you on your way in starting analysing the data, GWOSC has a set of tutorials (and don’t forget the Data Analysis Guide), and a collection of open source software. Have fun, and remember, it’s never aliens.
Bonus notes
Release schedule
The current policy is that data are released:
- In a chunk surrounding an event at time of publication of that event. This enables the new detection to be analysed by anyone. We typically release about an hour of data around an event.
- 18 months after the end of the run. This time gives us chance to properly calibrate the data, check the data quality, and then run the analyses we are committed to. A lot of work goes into producing gravitational wave data!
Start marking your calendars now for the release of O3 data.
Summer studenting
In summer 2019, while we were finishing up on the Data Analysis Guide, I gave it to one of my summer students Andrew Kim as an introduction. Andrew was working on gravitational-wave data analysis, so I hoped that he’d find it useful. He ended up working through the draft notebook made to accompany the paper and making a number of useful suggestions! He ended up as an author on the paper because of these contributions, which was nice.
The conspiracy of residuals
The Data Analysis Guide is an extremely useful paper. It explains many details of gravitational-wave analysis. The detections made by LIGO and Virgo over the last few years has increased the interest in analysing gravitational waves, making it the perfect time to write such an article. However, that’s not really what motivated us to write it.
In 2017, a paper appeared on the arXiv making claims of suspicious correlations in our LIGO data around GW150914. Could this call into question the very nature of our detection? No. The paper has two serious flaws.
- The first argument in the paper was that there were suspicious phase correlations in the data. This is because the authors didn’t window their data before Fourier transforming.
- The second argument was the residuals presented in Figure 1 of the GW150914 Discovery Paper contain a correlation. This is true, but these residuals aren’t actually the results of how we analyse the data. The point of Figure 1 was to that you don’t need our fancy analysis to see the signal—you can spot it by eye. Unfortunately, doing things by eye isn’t perfect, and this imperfection was picked up on.
The first flaw is a rookie mistake—pretty much everyone does it at some point. I did it starting out as a first-year PhD student, and I’ve run into it with all the undergraduates I’ve worked with writing their own analyses. The authors of this paper are rookies in gravitational-wave analysis, so they shouldn’t be judged too harshly for falling into this trap, and it is something so simple I can’t blame the referee of the paper for not thinking to ask. Any physics undergraduate who has met Fourier transforms (the second year of my degree) should grasp the mistake—it’s not something esoteric you need to be an expert in quantum gravity to understand.
The second flaw is something which could have been easily avoided if we had been more careful in the GW150914 Discovery Paper. We could have easily aligned the waveforms properly, or more clearly explained that the treatment used for Figure 1 is not what we actually do. However, we did write many other papers explaining what we did do, so we were hardly being secretive. While Figure 1 was not perfect, it was not wrong—it might not be what you might hope for, but it is described correctly in the text, and none of the LIGO–Virgo results depend on the figure in any way.
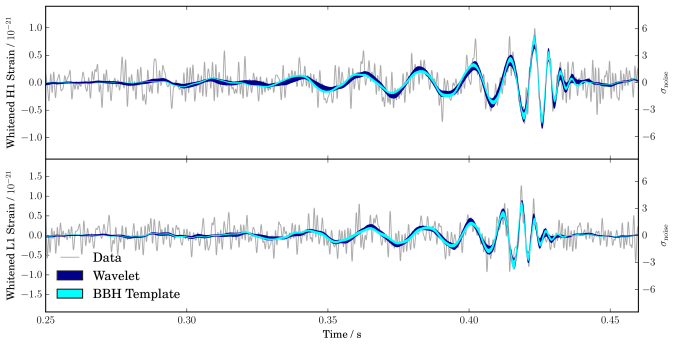
Recovered gravitational waveforms from our analysis of GW150914. The grey line shows the data whitened by the noise spectrum. The dark band shows our estimate for the waveform without assuming a particular source. The light bands show results if we assume it is a binary black hole (BBH) as predicted by general relativity. This plot more accurately represents how we analyse gravitational-wave data. Figure 6 of the GW150914 Parameter Estimation Paper.
Both mistakes are easy to fix. They are at the level of “Oops, that’s embarrassing! Give me 10 minutes. OK, that looks better”. Unfortunately, that didn’t happen.
The paper regrettably got picked up by science blogs, and caused much of a flutter. There were demands that LIGO and Virgo publically explain ourselves. This was difficult—the Collaboration is set up to do careful science, not handle a PR disaster. One of the problems was that we didn’t want to be seen to policing the use of our data. We can’t check that every paper ever using our data does everything perfectly. We don’t have time, and that probably wouldn’t encourage people to use our data if they knew any mistake would be pulled up by this 1000 person collaboration. A second problem was that getting anything approved as an official Collaboration document takes ages—getting consensus amongst so many people isn’t always easy. What would you do—would you want to be the faceless Collaboration persecuting the helpless, plucky scientists trying to check results?
There were private communications between people in the Collaboration and the authors. It took us a while to isolate the sources of the problems. In the meantime, pressure was mounting for an official™ response. It’s hard to justify why your analysis is correct by gesturing to a stack of a dozen papers—people don’t have time to dig through all that (I actually sent links to 16 papers to a science journalist who contacted me back in July 2017). Our silence may have been perceived as arrogance or guilt.
It was decided that we would put out an unofficial response. Ian Harry had been communicating with the authors, and wrote up his notes which Sean Carroll kindly shared on his blog. Unfortunately, this didn’t really make anyone too happy. The authors of the paper weren’t happy that something was shared via such an informal medium; the post is too technical for the general public to appreciate, and there was a minor typo in the accompanying code which (since fixed) was seized upon. It became necessary to write a formal paper.

Peer review will save the children! Credit: Fox
We did continue to try to explain the errors to the authors. I have colleagues who spent many hours in a room in Copenhagen trying to explain the mistakes. However, little progress was made, and it was not a fun time™. I can imagine at this point that the authors of the paper were sufficiently angry not to want to listen, which is a shame.
Now that the Data Analysis Guide is published, everyone will be satisfied, right? A refereed journal article should quash all fears, surely? Sadly, I doubt this will be the case. I expect these doubts will keep circulating for years. After all, there are those who still think vaccines cause autism. Fortunately, not believing in gravitational waves won’t kill any children. If anyone asks though, you can tell them that any doubts on LIGO’s analysis have been quashed, and that vaccines cause adults!
For a good account of the back and forth, Natalie Wolchover wrote a nice article in Quanta, and for a more acerbic view, try Mark Hannam’s blog.